How to Start a Podcast in 2019: 8 Steps from Idea to Launch

I’ve started two podcasts now: one older one focused on helping college students get on career and life paths they’re more excited about, and one focused on thought-provoking ideas from great books.
Podcasts are fairly easy to keep doing once you have them setup, but the starting a new podcast is confusing, poorly documented, and intimidating. A big part of why I put off starting Nat Chat for so long is that it’s a mess to figure out exactly how to get a podcast started.
Now that I’ve gone through it twice, I’ve figured out a step-by-step method you can run through to start your own podcast. It’s broken out into 8 steps:
- Get your gear
- Record your first three episodes
- Figure out the fun stuff
- Prepare your stock material
- Edit your first episodes
- Upload your first podcast episode
- Launch your podcast
- Systematize your podcast
You’ll want at least a month of time between initial setup and publishing your podcast, and I’ve broken down the steps based on that timeline. You can do it in less time (for Made You Think we did it in 3 weeks), but it’ll be rushed. For Nat Chat I did it in 6 weeks. I might recommend that if you really want to be sure everything is ready to go.
Alright, let’s get started!
Step 1: Get Your Gear (4+ weeks from launch)
First off, to be clear, I recommend not starting with naming your podcast. Definitely start thinking about the name of your podcast, but don’t feel like you need to have it locked in yet. If you listen to the first episode of Nat Chat, Adil and I talked about what I was going to call the podcast. It’s not necessary to have it figured out yet, for reasons that’ll make more sense later.
Recording Gear
What you should start with instead is figuring out what kind of format you want to do, and getting the gear you need. There are basically three podcast formats:
- You talking to a mic (solo)
- You interviewing someone(s)
- You and a co-host(s) talking
Depending on which format you want, you’ll need to get different kinds of gear to record your podcast.
Solo Show
If it’s just you, then all you need to start is a basic high-quality microphone you can plug into your computer like the ATR-2100 USB microphone. That’s what I use, and what many of my podcasting friends use, and it works great. Whenever you hear me talking in Nat Chat, that’s what I’m speaking into.
Interview Show
If you’re going to interview people, you have a couple options. At the very least, you should get an ATR-2100 for interviewing people over Skype. But I’d also recommend getting a physical recorder like the Zoom H4N and a second ATR in case you want to do in-person recordings. The in-person conversations have been some of my best (check out Adil, Justin, and Kevin) and whenever you can do an interview in person, it’s worth it.
For an interview show, I’d pick up everything I started with, which was:
- 2 ATR-2100s
- A Zoom H4N
- A Micro SD card
And then you’ll also need the Ecamm Call Recorder for recording your interviews when you do them over Skype. This tool works great, and it makes it easy to split the tracks on export which will make your editing much simpler.
Co-host Show
If you’re doing a co-hosted show, then you might not need the web software, but you’ll still need a mic for each co-host and a recording device to plug into. If it’s just you and a friend, then you can use the same combination as the last section (that’s what Neil and I use), but if you want more than two people on the show regularly, you’ll need to get a recorder that can take more than 2 inputs like the Zoom H6.
One other thing you might consider getting is a pop filter so that you don’t accidentally make “popping” noises into the microphone by blowing a bunch of air into it. You can edit them out, but it’s way easier to just not have to deal with them in the first place by getting the filter.
This is all you need for right now. Just get the basic gear so you can get started and build some momentum.
Step 2: Your First Three Episodes (4 weeks from launch)
Now it’s time to get a few episodes recorded so you have them ready to go right when you launch. This will give everyone who discovers your podcast in the beginning a few episodes to listen to, and it will spike your initial download numbers which can help get you into the New and Noteworthy section of iTunes.
For your very first episode, I’d recommend starting with someone you’re already friends with and comfortable talking to (if it’s an interview show). This will make it much lower pressure and help with getting into the flow of the interview. You also might consider doing your first few episodes over Skype, since then you can have your notes on the interviewee open as you’re going.
Whether you’re doing an interview, solo, or co-hosted show, find a quiet enough space to record where there won’t be much ambient noise picked up. The easiest way to make your show seem amateur is to have cars, animals, people, and other noises in the background. The more you can do to reduce the background noise while recording, the easier your job will be with editing later.
Also, whether you’re on Skype or in person, record the show in split channels, not in one mono track. Your physical recorder should do this automatically, and the Skype recorder will let you export split tracks when you’re done. This will make your life infinitely easier during editing, since you’ll be able to edit a cough out of one track without losing what the other person said.
A few more general tips for making these first recordings good:
Don’t worry about pauses and breaks. You can edit them out later, the audience will never know.
Speak slower than you think you should. We speak quite a bit faster when we’re nervous, and it’ll be hard to understand you if you let that happen. Slow down, speak slower than feels natural, and you’ll get it about right.
Don’t interrupt. Podcasts sound awkward when you can tell that the host wants to insert their own ideas over whatever the other person is saying. Let them talk! You can disagree and push back, but let them finish their ideas first.
Plan them : Don’t script the conversations out, and don’t lead them too much, but have an idea of where the conversations are going and how they’re going to wrap up. If you don’t have discussion topics prepared, you might get stuck in an awkward gap that breaks up the flow. Try to write down twice as many topic ideas as you think you need. They go faster than you expect.
Listen to your first few recordings to find improvements. Eventually you can stop listening to yourself, but in the beginning, listen to them and see where you could have improved the interview. Ask the guest for feedback afterwards, too, if they’ve been on a number of other shows before.
Do at least three episodes to start out. This will give you a small queue of episodes to start with on launch, and it’ll force you to do a few in very quick succession to get comfortable with interviewing, talking, or working with your co-host. It’ll also give you a very quick sense of whether you like this or not. If you don’t like it after recording those first few interviews, it’s better to find that out now and quit before investing a ton of time into building the site, setting up hosting, getting a logo, and so on.
Step 3: The Fun Stuff (3 Weeks Out)
After you’ve recorded your first few episodes, now it’s time to figure out the fun parts of the podcast. Specifically:
- The name
- The cover art / logo
- The website
- The description
I suggest waiting until you’ve recorded a few episodes to do these for a few reasons:
First , people procrastinate the most on perfecting their title, description, cover art, etc. and you could easily never start if you don’t already have some momentum.
Second , recording a few episodes will help you shape the direction of the podcast and get ideas for titles and descriptions.
Third , you might realize that you don’t like doing it! It’s better to figure that out early and then quit before you’ve invested money in a logo.
Now a few notes on the fun parts:
The Podcast Name
There’s conflicting recommendations on name. Some say it should be highly descriptive in order to tell people what they’re getting and to show up in iTunes, but I’m not sure that’s totally desirable. Or that it’s necessary.
For example, let’s look at the top 36 podcasts on iTunes right now:
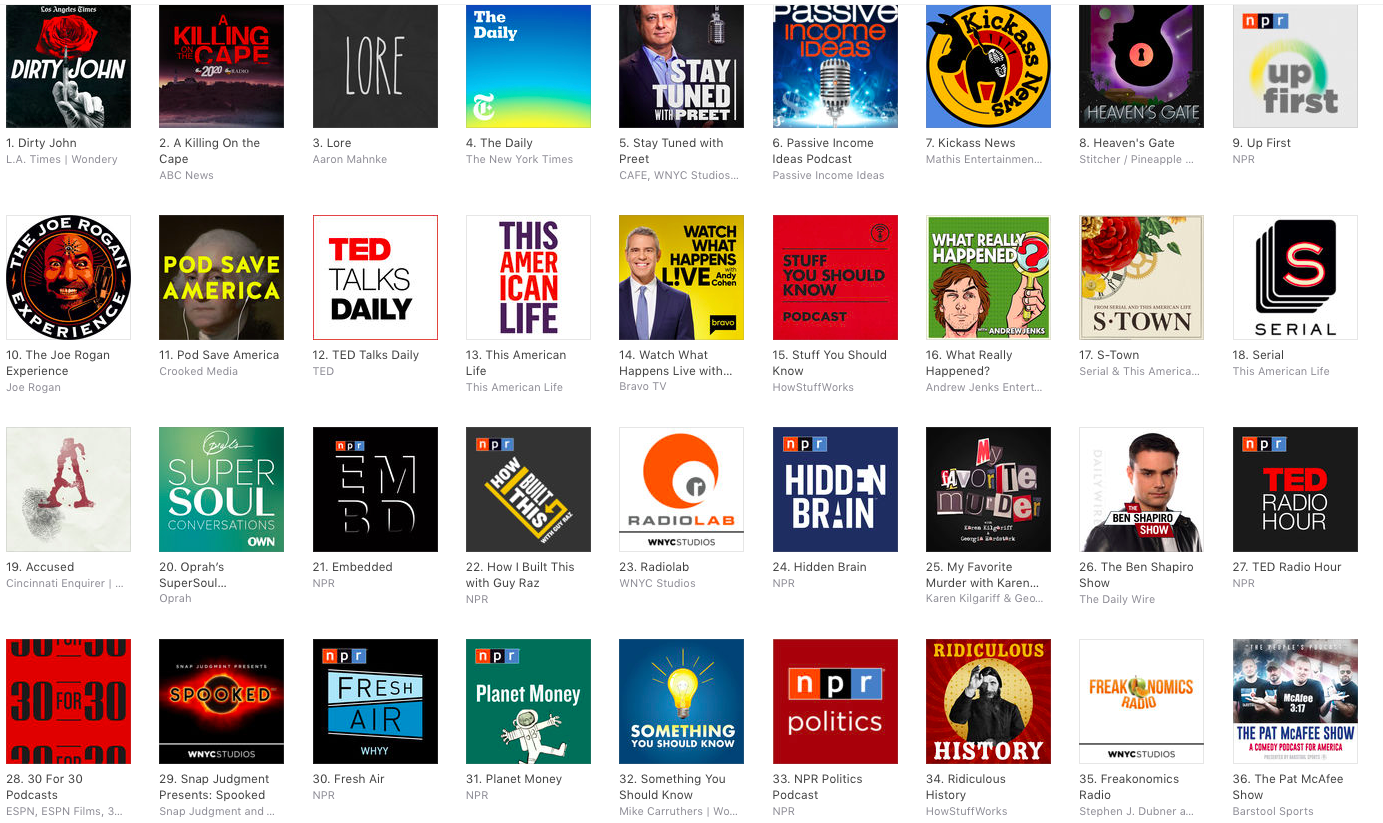
There are only a few with “descriptive” titles: Passive Income Ideas , Stuff You Should Know , Something You Should Know.
Most of the titles are names, brands, or semi-descriptive (like “Pod Save America”). But if you listen to many of the other “start a podcast” articles, they’ll say you need to have a title like Super Secret Real Estate Investing Podcast: How to Make a Fortune Flipping Houses Money Money Money Live on a Beach Retire Early Follow Your Dreams Inspiration Cast.
Descriptive titles are fine, but don’t go overboard with them. The safest bet is to pick something that can grow with your interests over time, instead of locking yourself into too narrow a niche.
The Podcast Cover Art / Logo
The best advice I can give you for the logo is to not get something cheap. Absolutely do not hire someone on Fiverr to make it. There’s a reason they’re charging $5 for their work. Get someone good on UpWork or from your network, and expect to pay $500+.
To help them, compile some logos you like that will give them a sense of your taste. And send over any ideas that you have. For Made You Think, we already knew we wanted the 🤔 emoji in it, so we gave that and the title to Adil and he ran with it.
When you get the logo, make sure it’s in very high resolution (at least 1600×1600) so that you’re sure it’ll look good in podcast players. Also make sure you get the colors used for it, since you’ll want those for your website and any other related assets.
The last thing you should ask for is a Facebook cover image, and a YouTube optimized version of the logo for posting your recordings to YouTube with a static background. The dimensions for Facebook are 851:315, and for YouTube, 16:9.
The Podcast Description
You need some description for your podcast… but honestly, I’m not sure how many people read these. How many of them do you read before you subscribe? You should give some thought to it, and include some keywords that you want your podcast to show up for, but I wouldn’t worry about it too much. As long as it gets the gist across, you’re probably fine.
For reference, these are my two descriptions:
“In this season of Nat Chat, Nat Eliason and guests seek to provide another path for college students and recent grads who feel the system failed them. Each week, we’ll explore new aspects of college, work, independence, and how you can design a post-grad life you’re excited about, instead of one that you fall or are pushed into.”
“Made You Think is a podcast by Nat Eliason and Neil Soni where the hosts and their guests examine ideas that, as the name suggests, make you think. Episodes will explore books, essays, podcasts, and anything else that warrants further discussion, teaches something useful, or at the very least, exercises our brain muscles.”
The Podcast Website
Last, you should have some website associated with the podcast where you can post show notes, have people sign up, and to give listeners an easy page to share with their friends who might be interested in the show.
This does not need to be complicated. For the Made You Think website, it’s a simple WordPress site hosted on CloudOptimus with the 2016 theme applied. It took us maybe an afternoon to set up.
The website might seem like an unnecessary step, but it’s worth grabbing now and at least posting links to your episodes on it since you might want the website later as you get more into podcasting.
Social Media
It’s up to you how much social media you want for your show. You could go all the way and set up a Twitter, Facebook, Instagram, etc. but I’d start with keeping everything under whatever existing branding you have for now. If you have no “professional” social media, then go ahead and set one up, but if you already have a blog with social media or if you already do everything under your personal social media, go ahead and stick to that.
For Nat Chat, I left everything under my personal accounts, and for Made You Think, we created a Facebook page since that made sharing easier and Facebook pages are simpler to maintain than additional Twitter accounts.
As a rule of thumb: under-engineer for now and you can always add things later. You don’t want to spend a ton of time designing the other pieces of the podcast before you’re sure that you’ll stick with it.
With all of your media figured out (and while probably waiting on your logo), the next step is recording your stock material.
Step 4: Prepare Your Stock Material (2.5 Weeks Out)
Now that you know your title, URL, and have some description copy, it’s time to prepare the stock material for your episodes. These are the pieces that you can copy and paste into each show to give it some consistency, and to make sure you plug whatever actions you want your audience to take.
Typically, this will include:
- A call to action, like to sign up for your newsletter (less than a minute long)
- An outro, reminding people where to get show notes and about the call to action (1-2 minutes)
- Any sound effects you want to use
It could also include any advertisements, but since you’re just starting out it’s unlikely you’ll be able to land sponsors (unless you already have a large audience from another platform).
This is also the point where you should start thinking about workflow and file management. The way I have it organized, I have a folder in Dropbox for all of the audio and media files for my shows, separated into episodes, stock media, and stock sounds:
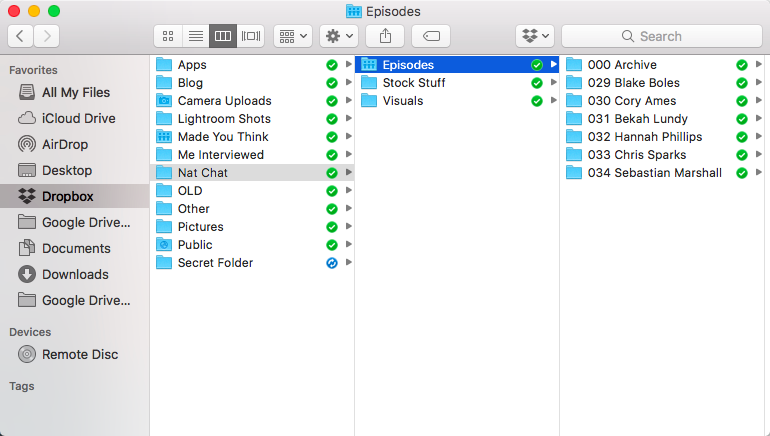
In each episode folder, I keep the recordings from that episode plus the intro, and then combine those with my stock recordings (in the “Stock Stuff” folder) to make the episode.
If you haven’t already, set up an easy to navigate file system for all of your podcast info so you know where it is and so that it’s easy to move through the workflow of making and editing new episodes.
The final thing you should do at this stage is record a short, 1-3 minute intro to your show. This will be your first “episode” and it will give people an overview of what your show is about. If you want some inspiration, here they are for Nat Chat and Made You Think.
With your stock material and intro prepared, it’s time to do some editing!
Step 5: Edit Your First Three Episodes (2 Weeks Out)
Now for, to be honest, the least fun part, and the part most people quit at. Editing. Editing can turn into a huge operation, so for starting out, you need to keep it simple.
The easiest way to keep it simple is to make a good recording from the start. That means:
- Record somewhere quiet
- Be careful to avoid using too many filler words
- Don’t interject too much (“yeah!” “uh huh” “okay” etc.)
But you still need to edit your episode once it’s recorded. Here’s the easiest way to do that, assuming you recorded in Skype.
Load Your Media in Garageband
I used Garageband for all of my editing since it’s free, easy to use, and fairly intuitive. There are other options for editing software, like Adobe Audition and Audacity, but I haven’t used them so you’ll have to figure out the fine details of using them elsewhere. If you’re on a Mac, though, definitely just go with Garageband.
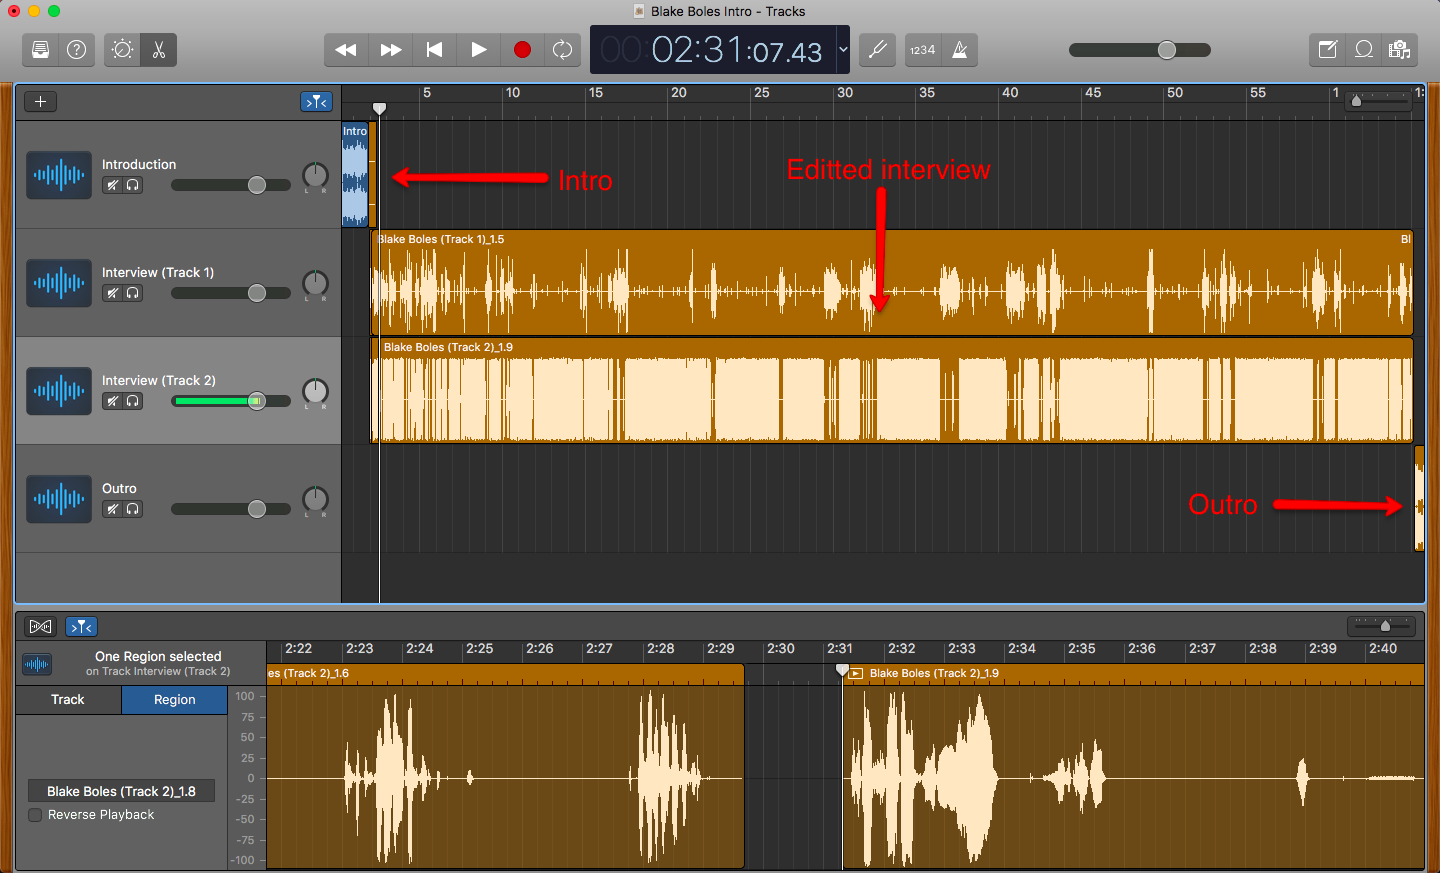
Drop in all of your media to garageband, splitting it out by the Intro, Episode, and Outro
First, drag and drop in the “intro” to your episode, which you should record immediately after doing the episode while it’s still fresh:
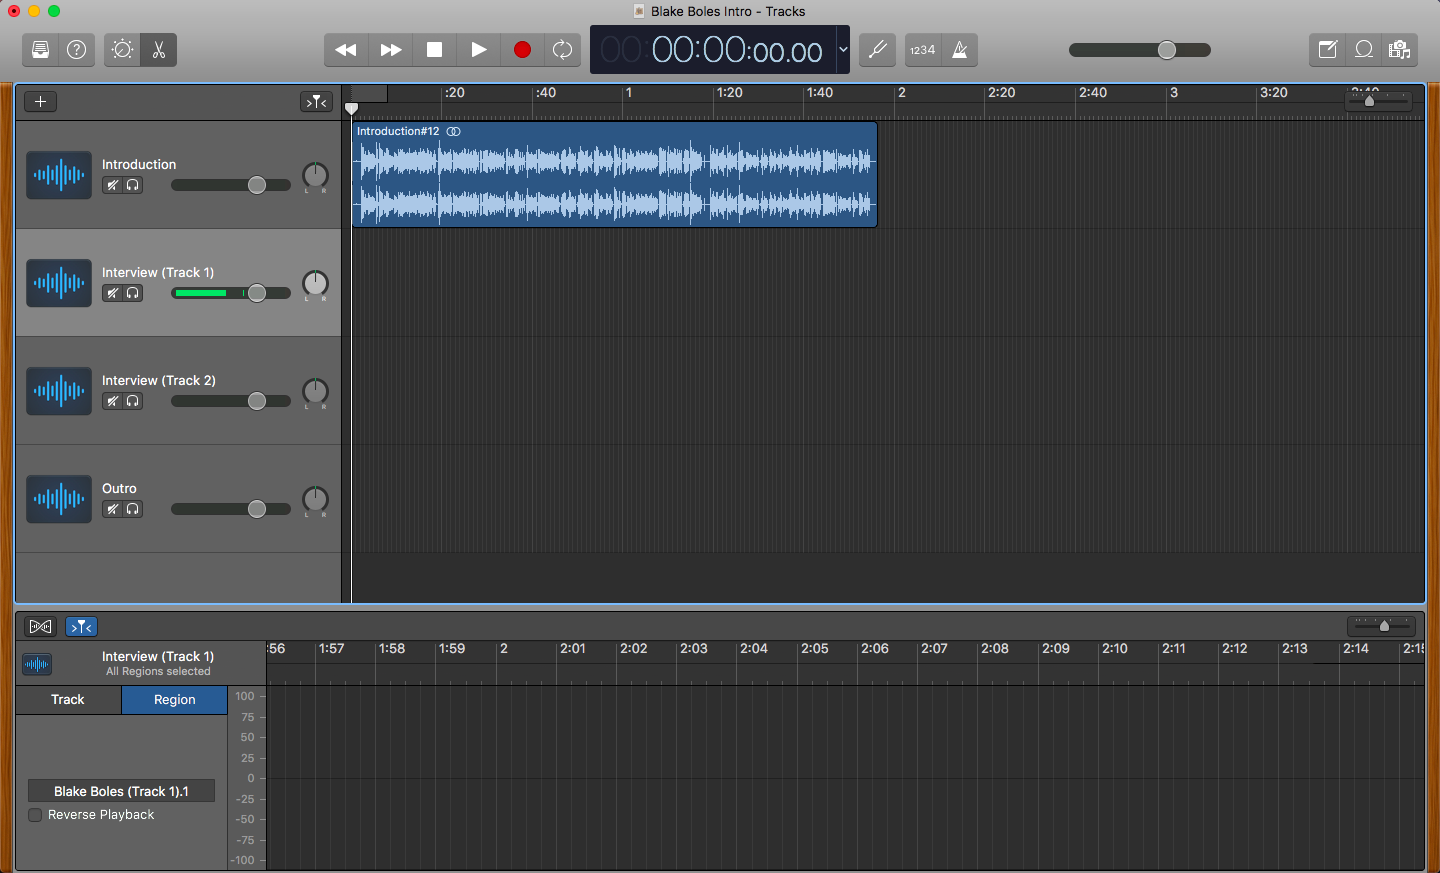
Then add any transition sound effects that you have right after the intro:
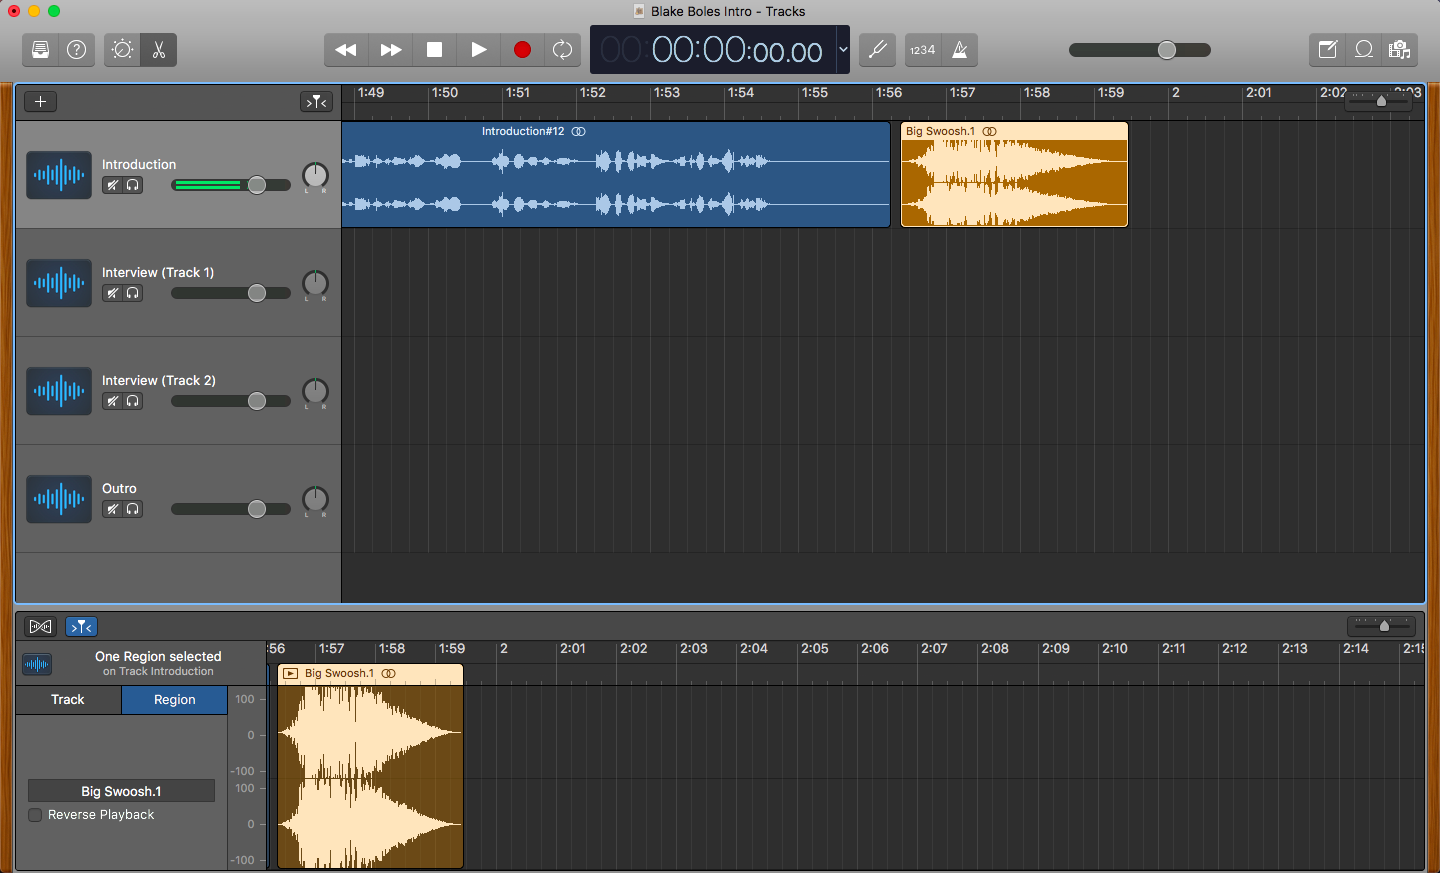
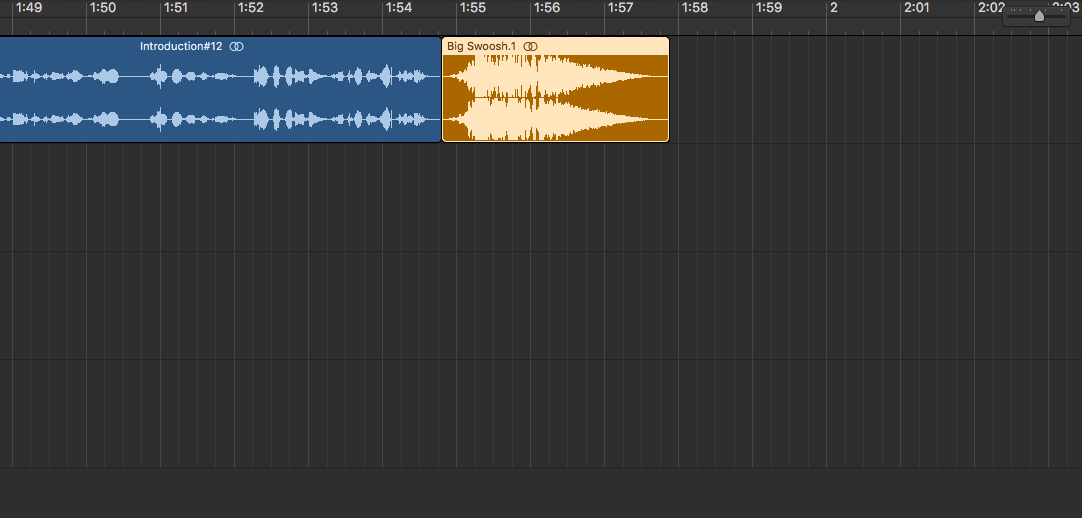
To make sure it’s in the right spot, you can drag it on top of the intro so that it makes the sound effect exactly when you want it to:
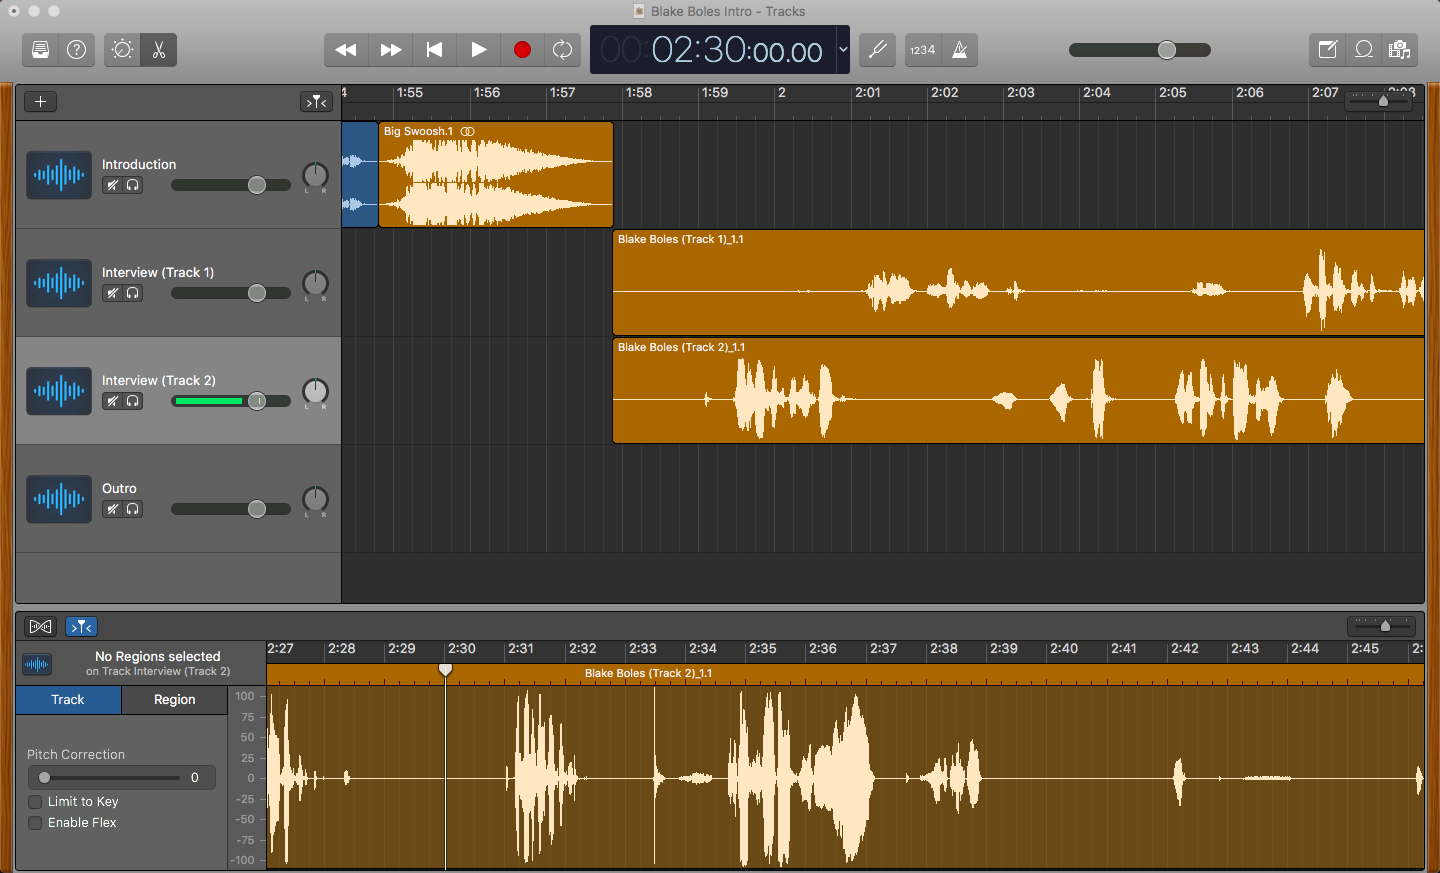
Next, drag in the two tracks that you exported from Skype. You’ll need to line them up perfectly with each other, and make sure that they line up with when the sound effect ends. This will be much easier if you zoom in a lot.
Now, listen through the interview and make any edits!
At this point you should exclusively focus on things that need to be cut–don’t worry about volume differences or audio quality. We’ll fix that next. Just listen through and see where pieces need to be cut. This will fall into two categories:
- Parts of the whole conversation that need to be removed (awkward pauses, etc.)
- Parts on one track that need to be cut (coughs, interruptions, etc.)
If it’s the first kind where a section needs to be cut, just line up the play line at where the cut needs to start, select both tracks (holding SHIFT), and then type CMD+T to split them:
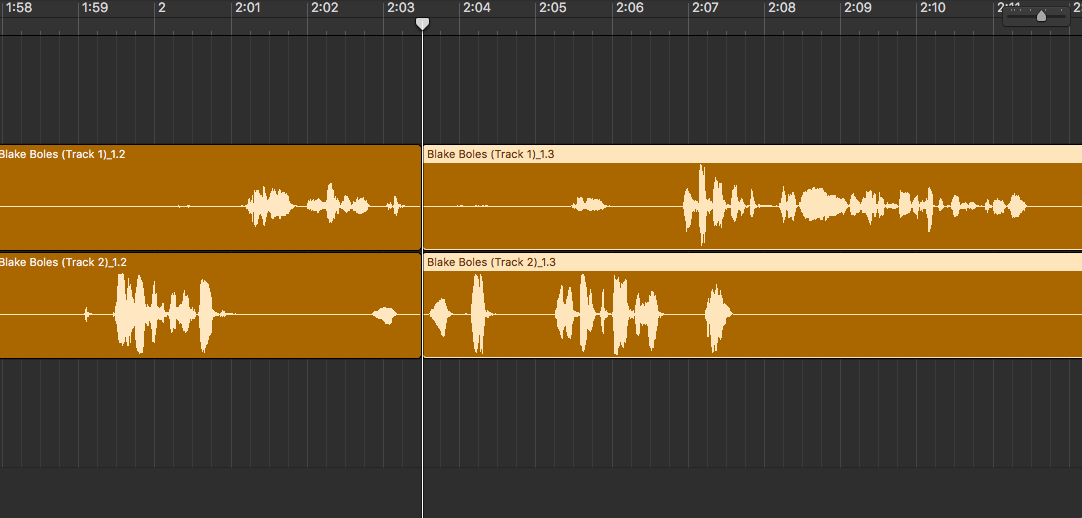
Next, go to where you want the track to resume and do the same thing:
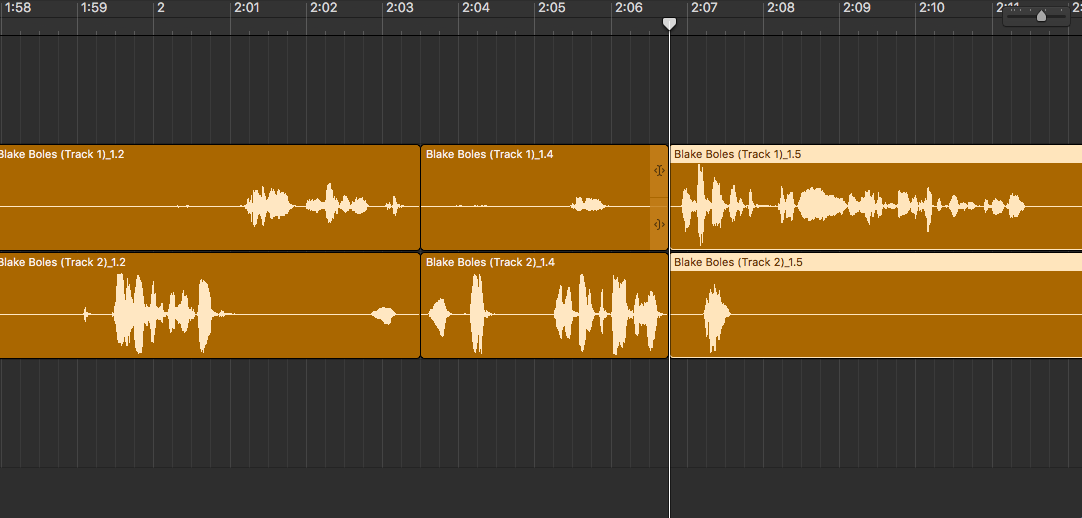
Then delete the chunk in the middle:
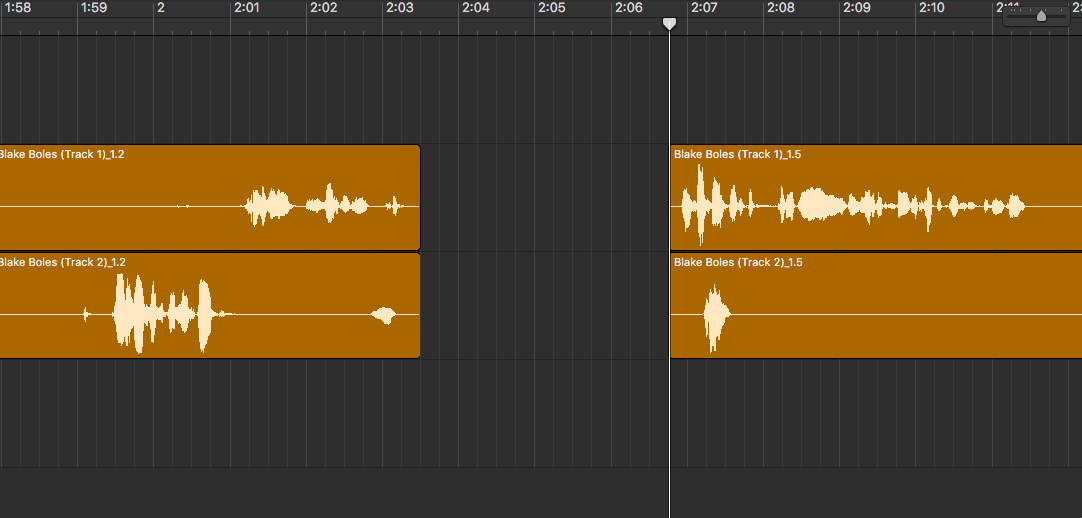
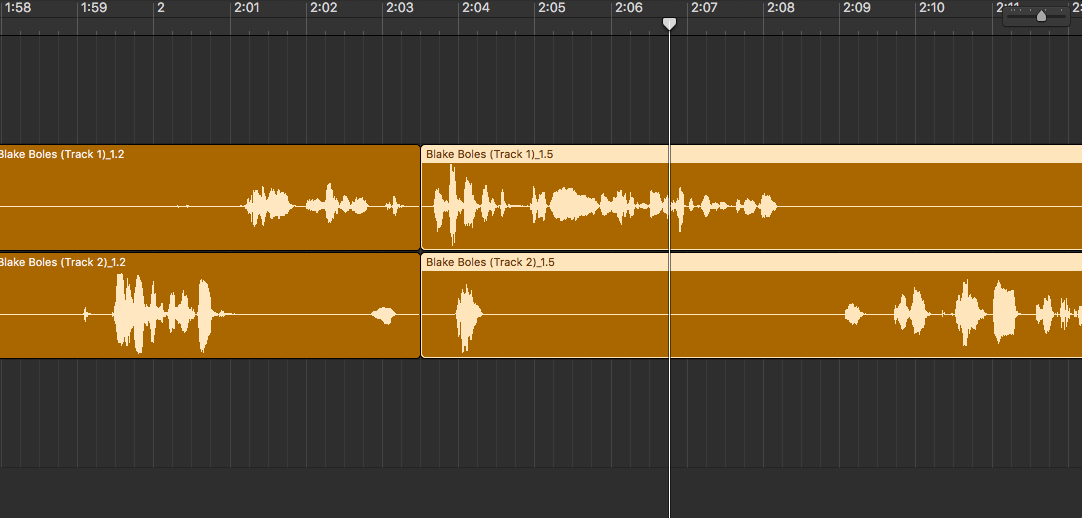
And drag the part on the right back so it lines up with the part on the left, and so the audio flows smoothly. You may need to make some smaller cuts to get it sounding just right.
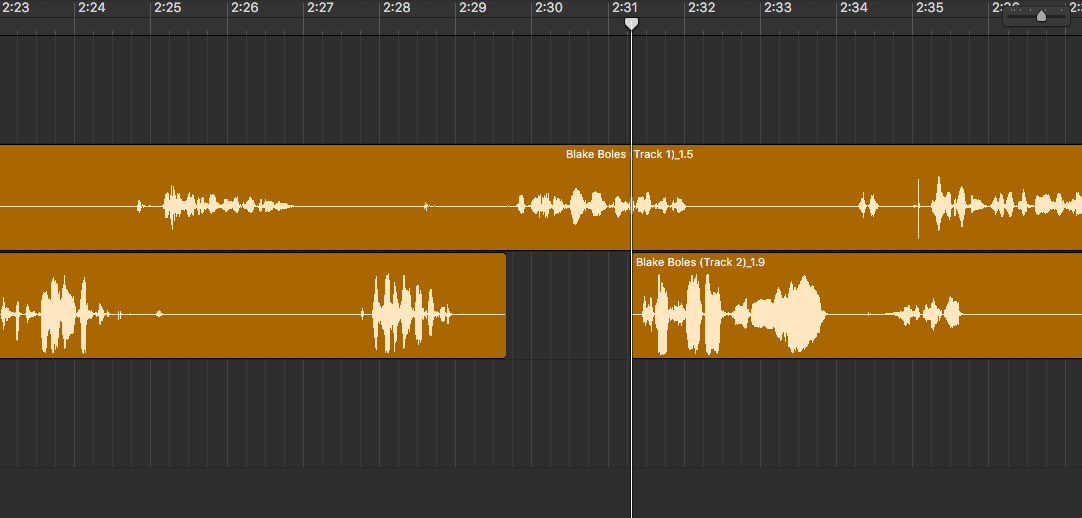
If you need to cut out part of just one track, do the same thing while only selecting the track that needs to be cut, but don’t move it forwards or backwards at all. If you do, your tracks will be out of sync. Just delete the part that needs to be removed and leave it as an empty space while the other track runs:
That’s really all you should worry about for editing right now. Once you get to the end of the track, drag in your sound effects and outro, and then do a quick listen through at the transition points to make sure everything lines up:
Then go to the top, click “Share,” then “Export Song to Disk”
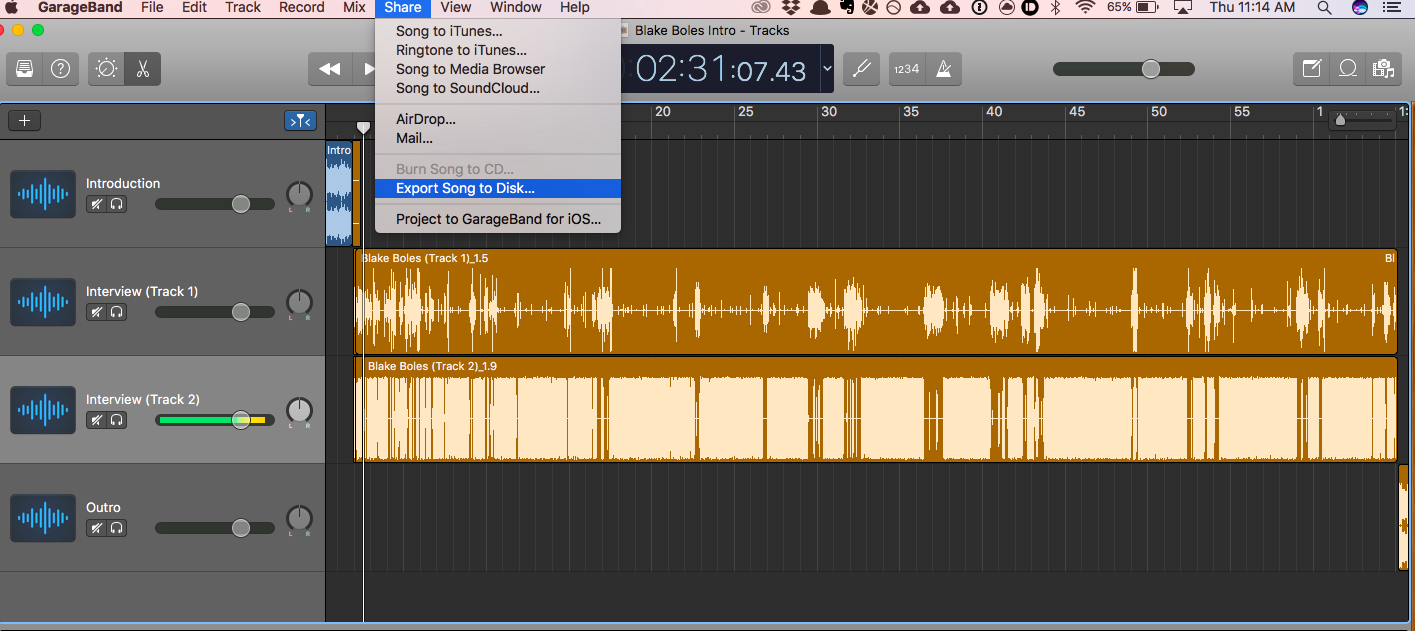
And save it as an MP3 file at the highest audio quality to your folder for that episode.
Now, we have to handle the sound quality, leveling, and other little audio details. This is kind of advanced audio processing, so the best thing to do is not do it yourself. Use Auphonic instead. Once you sign up and add some credits, you can upload your track and they’ll handle all of the leveling and background noise reduction for you. It’s fairly straightforward, and it will make a HUGE difference in how your show sounds.
Don’t worry too much about the metadata options that Auphonic gives you, except for the logo. Go ahead and upload your logo if you have it so it gets included in the episode metadata. It’s not necessary, though, since we’ll also do all of the metadata updates through our hosting.
As for the other settings, you can use what they recommend for improving the audio and leveling it out. Be sure to listen through at the end the first couple times to make sure everything came out fine.
Go ahead and do the editing for your first three episodes and your intro. Once that’s done, it’s time to move on to hosting your podcast.
Step 5.5: Plan Your Next Episodes
One quick thing first though. If you made it through recording your first three episodes, editing them, and setting everything up online, then it’s time to start planning your next episodes. You need to do this now, before you launch, so that you can keep a steady schedule going once you get started.
I try to keep at least a 1-month lead time going between interviewing and publishing, which means I’ll have 4-5 episodes in the queue at anytime. This saves me from scrambling to get an episode out, and gives me and my team plenty of time to take care of editing and show notes.
Step 6: Upload Your Intro Podcast Episode (1 weeks out)
With everything edited, you can start setting up your podcast hosting service. This might take a week or longer , so it’s better to start it soon. Apple can take a few days to approve your podcast, so don’t leave this step for the last minute or you’ll miss your goal launch date.
I’m going to use Libsyn for my explanation, since it’s the service I use and so many other popular podcasts use, and they do a great job at a low price. You can also use Blubrry, and even SoundCloud, but I’m going to focus on Libsyn.
Setting Up Libsyn
The first step is to sign up for a Libsyn account. You can get one of the more basic packages for now, it’s easy to upgrade later.
Once you’re signed up, you’ll need to plug in the basic info for your podcast. Specifically, the:
- Show Title
- Description
- URL
- Tags/Keywords
- Contact email
- Any social profiles
- The square, logo image
- The widescreen image
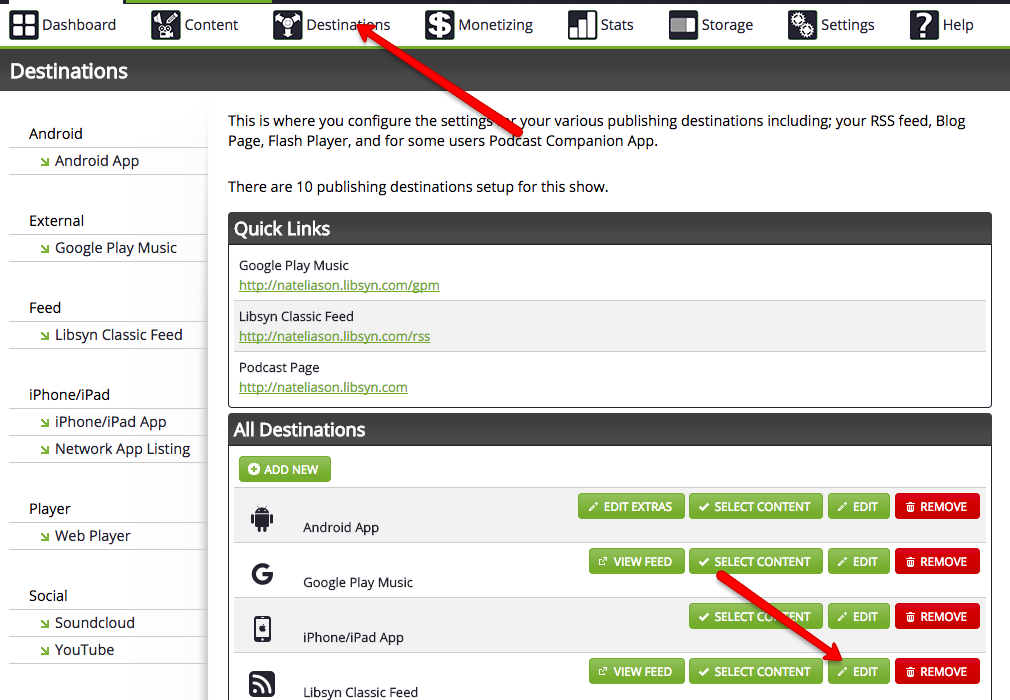
Next, we have to set it up for the iTunes store. Click on the “Destinations” tab, then click “Edit” on the Libsyn Classic Feed destination:
Here you can fill out the additional information for iTunes. Once you’re done, click Save at the bottom left.
You’ll get a confirmation box with the RSS link to your podcast feed. Save this link, we’ll need it for adding your show to iTunes and other distributors. It’ll probably look something like mine:

Now before we send your show to iTunes, we need to upload your podcast.
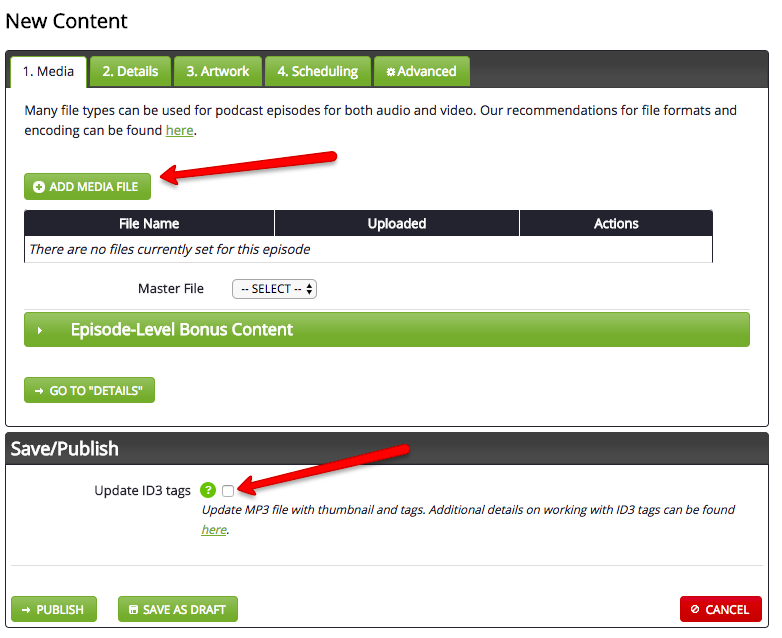
Go to Content -> Add New Episode:
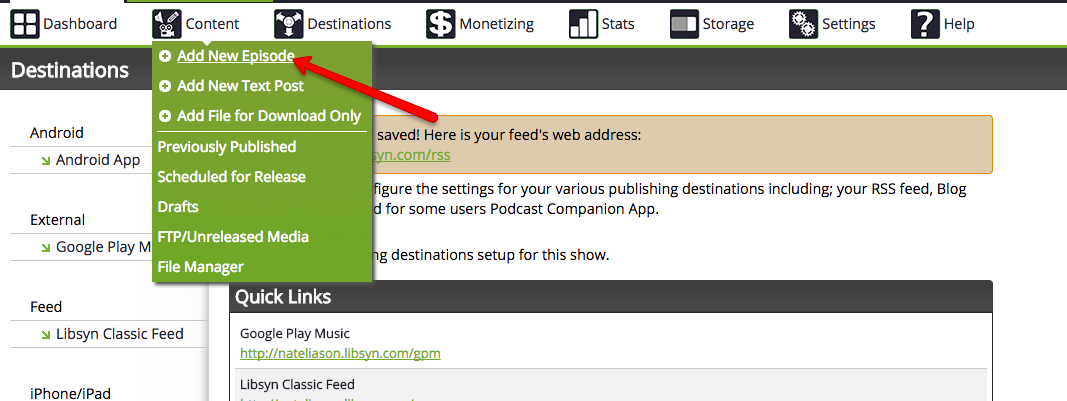
Upload your intro episode and check the “Updated ID3 Tags” box at the bottom.
Next:
- Go to the “Details” tab and plug in the Title, Description, and other information from your episode.
- Go to “Artwork” and make sure your logo is there. If it’s not, upload it.
- You can leave “Scheduling” as it is, but if you want to schedule other episodes for future releases, this is where you’d do it.
- You don’t need to do anything in “Advanced,” either.
- Click Publish!
This will publish your intro episode to your RSS feed and your Libsyn page. Now we need to send it to iTunes and the other podcast directories.
Adding Your Show to the iTunes Store
Go to Podcasts Connect, sign in or make an account, and then click the little “+” button in the top left:
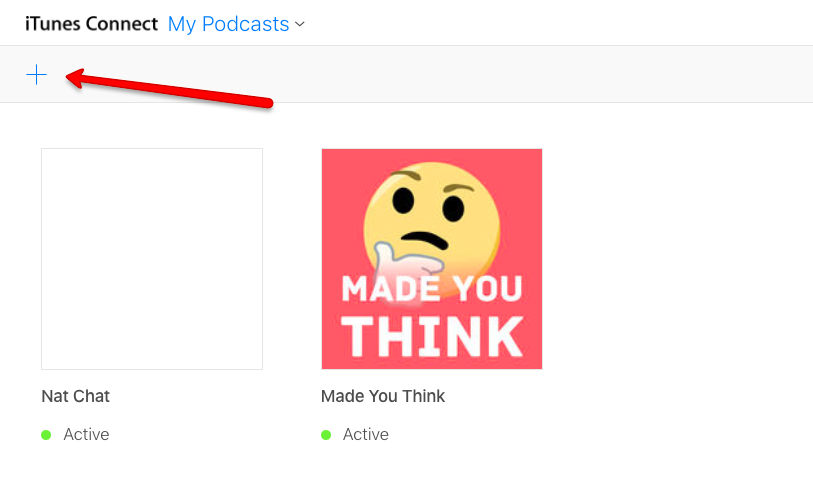
Copy in the RSS feed for your podcast, and then click “Validate.” Hopefully, all of your information will show up and it will say “Passed Validation,” but if you fail, it should tell you what you need to fix on Libsyn’s side.
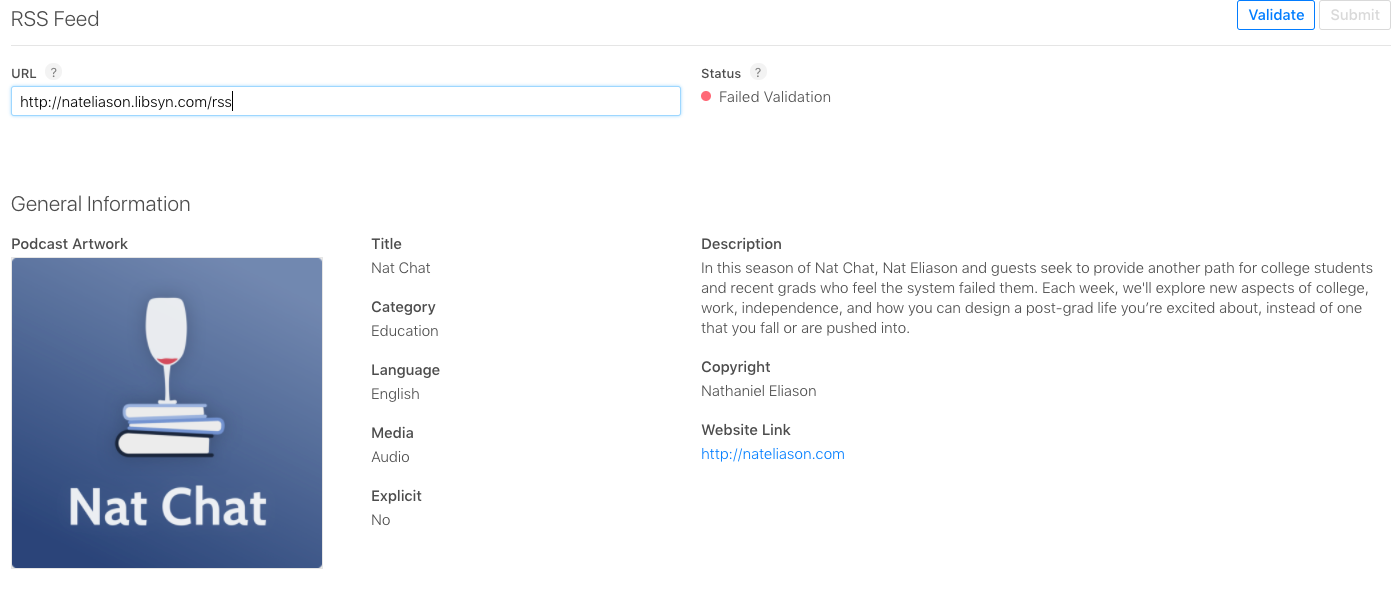
Once it passes, hit Submit, and wait! Like I said, it can take a few days, so be patient. While we wait, we can handle the other submissions.
Submitting to Stitcher
Stitcher is the other major podcast player, and one of the few that doesn’t pull from iTunes. Most other popular players, like Overcast, just use the iTunes API to get their podcasts and will take care of themselves, but Stitcher you’ll have to connect your podcast to manually.
You’ll need to go to the Content Providers page and sign up for an account. Once you’re in, you can click “Add Shows” at the top, and go through a similar process like with iTunes.

Type in your info, paste in the RSS feed, add some categories, and then submit. Stitcher is quite a bit faster than iTunes, so you shouldn’t have to wait too long.
The last one we need to do is Google Play.
Submitting to Google Play
Go back to Libsyn in the Destinations section, click “Add New” then select “Google Play Music”
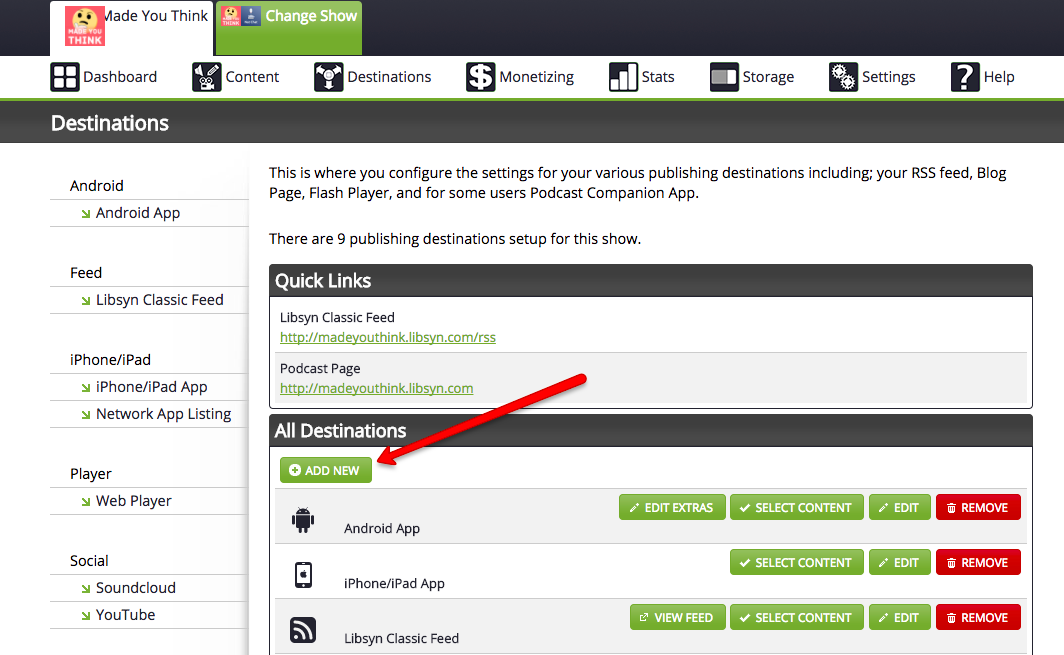
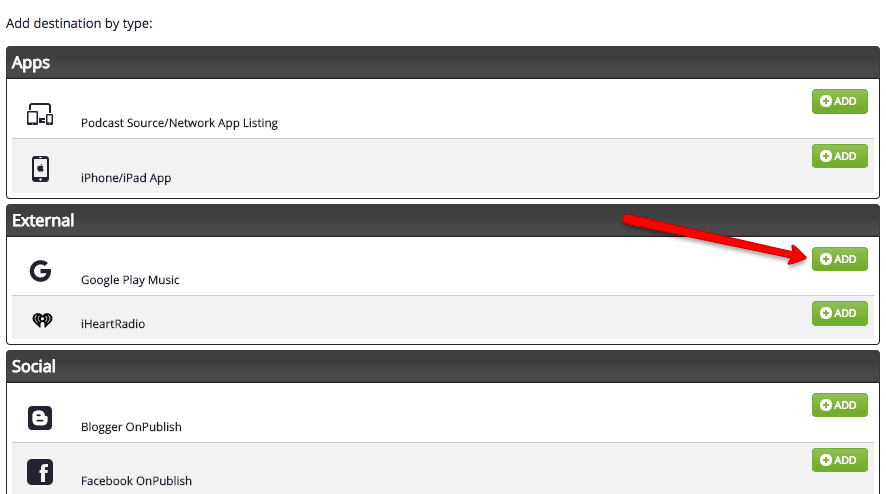
Fill in the information for your show, and hit “save.”
Then go to the Google Play Podcasts Portal, sign up if you need to, and then select “Add A Podcast”

Add the new Google Play Music RSS feed URL that you just created, verify ownership, and you should be good to go!
Submitting to Spotify
Spotify should pick up your podcast automatically once it's going out to iTunes. I didn't have to do any kind of manual setup for it, so just give it a couple weeks and your show should end up there.
Now you just need to wait until you get approved everywhere, and check that your intro episode came out fine in the different podcast players. I’d recommend downloading iTunes Podcasts, Stitcher, Google Play, Overcast, and Pocket Casts to make sure it showed up everywhere. I’ve had some issues with Pocket Casts, so if you don’t show up there, you can submit to them directly at this link.
You’re almost there! Now for the best part.
Step 7: Launch!
All you need to do to launch is upload your first two podcast episodes, go through the Libsyn setup from before, and hit publish on them. Assuming your intro episode went out fine, then the new episodes will go out fine too and all you’ll have to do is upload them to Libsyn, add the information, and hit publish in the future.
This is also the time to start publishing your show notes that you can send people to (and hopefully rank on Google for). The easiest way to reduce the amount of work you do is to write your show notes in Google Docs, upload the doc to WordPress using Wordable to make the blog post, then copy the HTML from the blog post to Libsyn so it’s already formatted.
As for how to launch your episodes, I’d do two on the first day that you “announce” then show, and then the third a few days later. This way you get a bunch of downloads right away and people have a few to check out.
After your launch, you can decide what cadence you want to publish at. Some people do it whenever they feel like, some do weekly, some 5 days a week, do whatever works for you. But definitely start with an easy schedule and then see if you want to increase it–don’t quit from taking on too much in the beginning.
Congrats, you now have a podcast! But there’s one last step to consider before you leave…
Step 8: Design a System
There are a lot of moving parts to running a podcast, and it’s easy for things to get lost, so I recommend designing a system to make it easy to keep publishing everything. This will help immensely with keeping yourself organized when it’s a solo operation, and if you get people to help you out, it’ll make their lives much easier too.
There are many ways to do this, but here’s how a podcast episode goes from start to finish for Nat Chat.
I keep on the lookout for good potential guests, then I’ll usually email them or get an intro asking if they’d like to be on the show. These aren’t crazy pitches, here’s a sample one:
If they say yes, I’ll send them a Calendly link where they can pick an interview time that works for them. Once they pick a time, it’ll be on both of our calendars, and they’ll automatically get sent a short document on what they should know about coming on the show (common topics, length, and so on).
Then, their name goes in my Trello board with the due date set to their interview date, so I know that I need to start prepping for their interview:
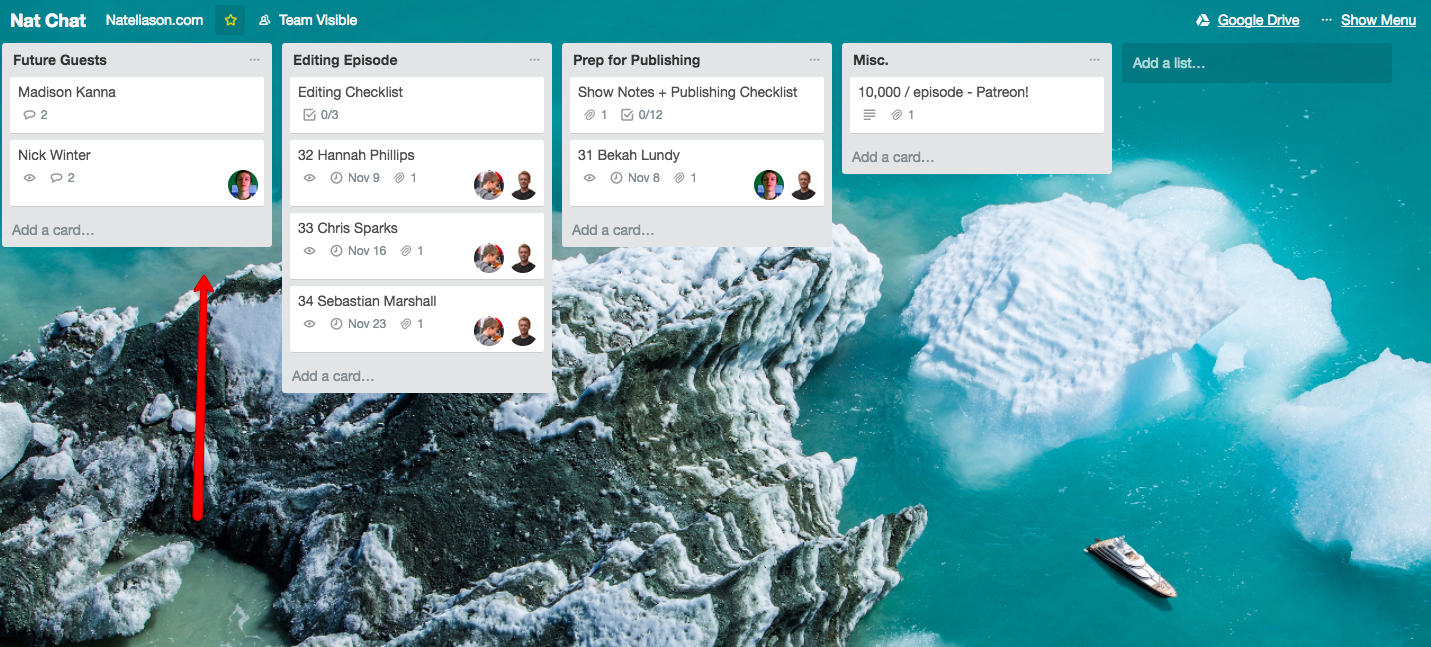
I’ll go through my typical research and prepare some topics for us to talk about, then do the interview. As soon as it’s done, I’ll record the intro, then drop all of the audio files in the corresponding Dropbox folder for that interview.
Next, I’ll take the link to the Dropbox folder, attach it to that guest’s trello card, and move them from “Future Guests” to “Editing Episode” and tag my editor, Andrés, on the card. I’ll set the due date for 1 week before the publish date.
Once Andrés is done with the episode, he’ll attach the final version to the card. I’ll remove him, move the card to “Prep for Publishing,” and tag Grey who helps out with all of the other pieces.
Grey will write up the show notes, send them to me for a final edit, and once they look good on my end he’ll take care of uploading them to the blog and Libsyn and scheduling the release of the episode and show notes.
The whole process typically takes 3 weeks, but we can do it in 1.5 if we’re rushed. There are checklists every step of the way to make sure we catch everything, and it’s been running without incident for the last ~20 episodes since I stopped doing the editing. At the very least, set up checklists for each step so you know exactly what needs to be done for quality assurance.
I wouldn’t recommend starting with getting help with this much of it, but I’d definitely recommend switching to it at some point to free yourself up a bit. Whatever part of the show you don’t like doing, get someone to help you with it. It’ll make a huge difference.
However you decide to go ahead with it, you’ll now have a podcast that you can keep publishing to for as long as you want! Best of luck, and definitely check out Nat Chat and Made You Think if you haven’t already.

