How I Put My Blog in Virtual Reality (Mostly)
One of the first ideas I had when starting to learn virtual reality programming was finding an interesting way to bring this site into VR. What would this site look like if it were a physical space, instead of a 2D series of pages?
I’ve gotten a decent amount of it working, so I wanted to share it with you. Unfortunately, I can’t get much further than this right now because of the current limits of WebVR, but it’s a good start!
Go here to visit Nateliason.com in VR.
You’ll also find on many articles a “view this in VR” option in the upper right. I’ll warn you, though, some articles do much better than others. It seems to be the long ones that have issues. I’m working on it. Also, as a general rule, text doesn’t look great in VR yet (resolution issues mostly) so… there’s that.
There’s one other caveat: link traversal doesn’t really work in WebVR yet. That means that if you’re using a headset, you can’t go from one link to another while staying in VR. The guys working on A-Frame say it’s coming soon, but until then, you’ll have to keep re-enabling the VR view on each page.
Okay, ANOTHER caveat: There’s also a lot of variation between browsers. And if you’re on an iPhone it’s going to be extra buggy.
Basically, what I’m saying is that this is not a polished experience and putting this blog in VR still has a long way to go, so don’t get your hopes too high and don’t make fun of me on Twitter. BUT! All of that aside it’s mostly sorta working! In a few months when the technology advances (especially the browsers) I’ll get it working better, but as a starting point, it’s not bad! And it was a hell of a lot of fun to work on and I learned a ton about A-Frame, Javascript, and improved my Rails along the way.
For the rest of this post, I’m going to dig in a bit on how I built it, to hopefully get you excited about the potential of WebVR, and show just how easy it is to get started building your own WebVR experiences.
One ask : If you’re particularly skilled at Ruby on Rails, or A-Frame, and you have any feedback on how I did things, please let me know on Github. Part of why I’m sharing this is to hopefully get feedback on how I can improve my programming since I’m very much new to it. I’ve only been using Rails for 3 months and A-Frame for 3 weeks, so there’s a lot of cowboy code going on here.
Getting Started with A-Frame
Obviously if you’re already familiar with A-Frame, feel free to skip this. This should be enough to get you up to speed to understand the rest of the article.
A-Frame is a magical Javascript library that creates virtual worlds with code. If you’re familiar with HTML and CSS already, it will look very familiar. (If you’re not familiar with HTML and CSS, you should go through the Codecademy course. It’s required knowledge for this day and age).
In HTML, you know that you can create a block of text with:
Text here!
And in A-Frame, you can create a box with:
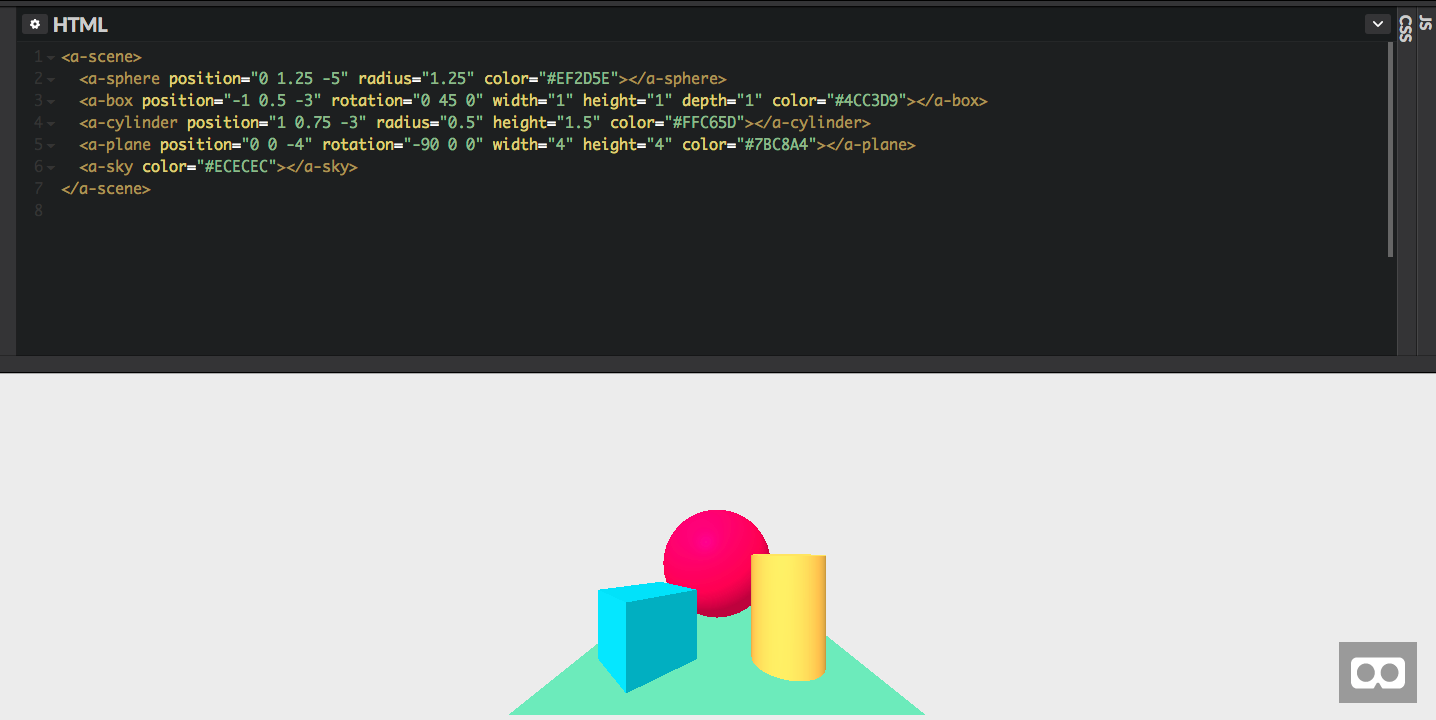
There are ~20 built in objects, like spheres, planes, and rings, as well as cameras, the sky, and the cursor.
Each of those objects also has default attributes. For example, if we want to make a big box and place it in front of you, we just add the position and scale attributes:
<a-box position=”0 0 5” scale=”3 3 3”>
This will put the box 5 units in front of you (0 on the X axis (left right), 0 on the Y axis (up down), positive 5 on the Z axis (forward back)), and give it dimensions of 3 x 3 x 3.
You can get all sorts of very basic scenes working just with these shapes and components. Feel free to play with this Codepen yourself:
Since these are all essentially HTML elements, you can also animate and add functions to them with Javascript. If you want things to appear, move, change on click, it all responds to JS just like normal HTML.
For the more advanced things, like having an object look at the camera, you use A-Frame components. These are additional functions you can apply to parts of the scene to add new abilities. You already saw the “position” and “scale” components, but there are also components for “animation,” “light,” “material (how it looks),” and “sound.”
And since components follow a basic JS format, anyone can make additional components to interact with A-Frame objects. If you go to the “Awesome A-Frame” GitHub you’ll find components for Text, Physics, Particle Systems, Teleportation, and more. All you have to do to use them is include their Javascript in your project.
That might all seem complicated, but it’s pretty straightforward once you get into it. Try a few of these intro tutorials to get your feet wet.
Backend of the VR Blog View
I want to focus for most of this post on A-Frame, but I’ll touch briefly on the server side of things.
I built the whole app using Rails, which I was able to get a strong enough understanding of mostly from the excellent One Month Rails course. That was enough instruction where I could figure things out on my own afterwards, to the point of being able to:
- Build the blog
- Scrape my own blog
- Display everything from Heroku
This whole VR blog view is basically your normal MVC app, just with a 3D view instead of a normal 2D one. You’ll see it in the code. If you know how to make a basic MVC app like the Pinterest clone in One Month Rails, then you know enough Rails to do this.
All I did on the backend was create a database for my articles with their titles, categories, original URLs, and contents, and then have that directly import from my normal blog. You can see that code in GitHub here. I also used Devise for user authentication and made sure that it only accepts new articles from me in case anyone tries to be clever.
Now, let’s dig into building the VR views for the individual parts of the site.
The Island Home View
The first thing I wanted to build was a new “home page” in VR. I started out with a room, but then realized that was a little dull and went for an island instead.

This is simply the welcome and starting point for the site. It has links to the list of Articles and Lessons, as well as a link to this article, and a little intro text. Here’s a bit on building the individual pieces.
The Environment (Sky, Ocean, Sand)
The sand is simply a very flat sphere, with a free “Sand” material applied to it that I found online. I went with a sphere because it looked nicer than the cylinder for some reason:
The ocean takes advantage of the Ocean component by Don McCurdy. It’s extremely simple, since all you do is set a size and position.
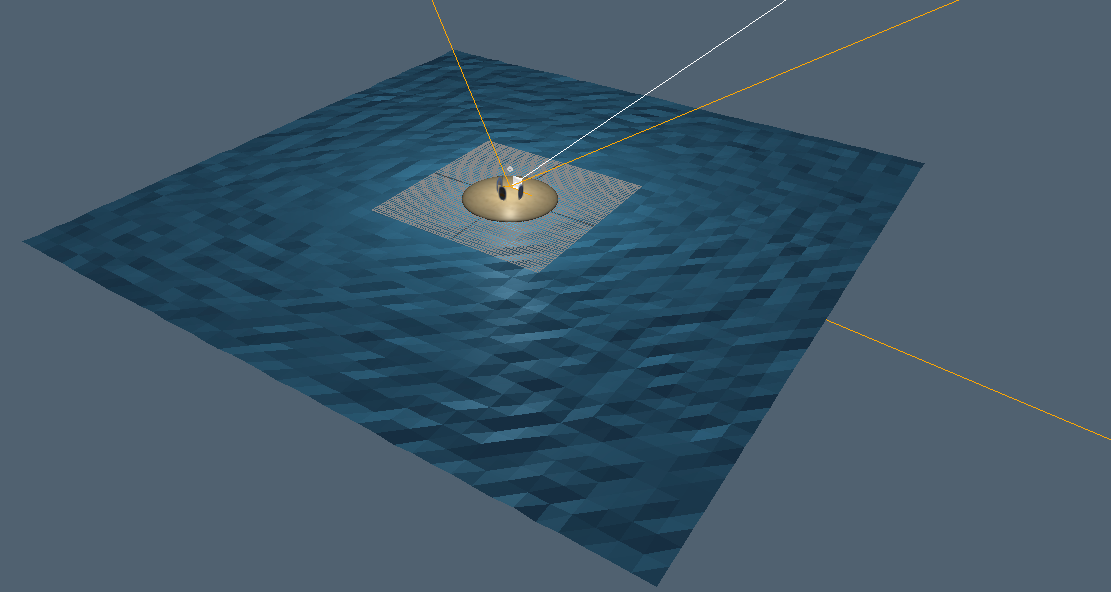
The sky was the last piece, and this was a little tricky since I wanted it to look like the ocean went on forever without blowing up your browser. So I lowered the sky’s position by 200 so that relative to the camera, it looked like the ocean went on forever, despite being finite:
Here’s how big it actually is:
Creating the Intro
Next I needed to make a little intro message to help orient people. Text in VR is a non-trivial challenge, since standard HTML isn’t meant for 3D rendering, but this fantastic HTMLTexture component essentially lets you do just that. You can take any HTML as input, and then apply it as a texture to an object, just like I applied the sand texture to the ground.
Then all I needed to do was add the HTML to the A-Frame assets at the top, and then project it onto a box-shaped entity:
Creating the Portals
Until Valve sends me a cease and desist, I thought it’d be fun to style the navigation between parts of my site like the Portals from Portal. This just required taking a screenshot of the page I wanted to navigate to, cropping it to the shape of the portal, saving the whole thing as a PNG, and then adding that as a transparent texture to a cylinder:
For the text on top of it, I used the BMFont component which creates nice 3D text without needing to make an HTML canvas:
Images and Textures
Normally for an A-Frame scene, you’d have a folder in the same directory as your HTML that has all of your assets and images. Since I was using Rails, I just put them all in the “images” folder and used the ERB “image_tag” to link to them in the assets section and things worked out fine:
<%= image_tag("sky1.jpg", :id => "sky") %> <%= image_tag("Sand001.jpg", :id => "Sand") %> <%= image_tag("BlogPortal.png", :id => "BlogPortal") %> <%= image_tag("ArticlesPortal.png", :id => "ArticlesPortal") %> <%= image_tag("LessonsPortal.png", :id => "LessonsPortal") %>
The Camera
Last piece. For the Camera, I used this boilerplate one from the Checkpoint Controls component, for reasons that will be apparent in the next section:
The Blog and Lesson Hallways
You can think of this site has having three layers of detail:
- The Home
- The Indexing pages (all articles, all lessons)
- The specific pages
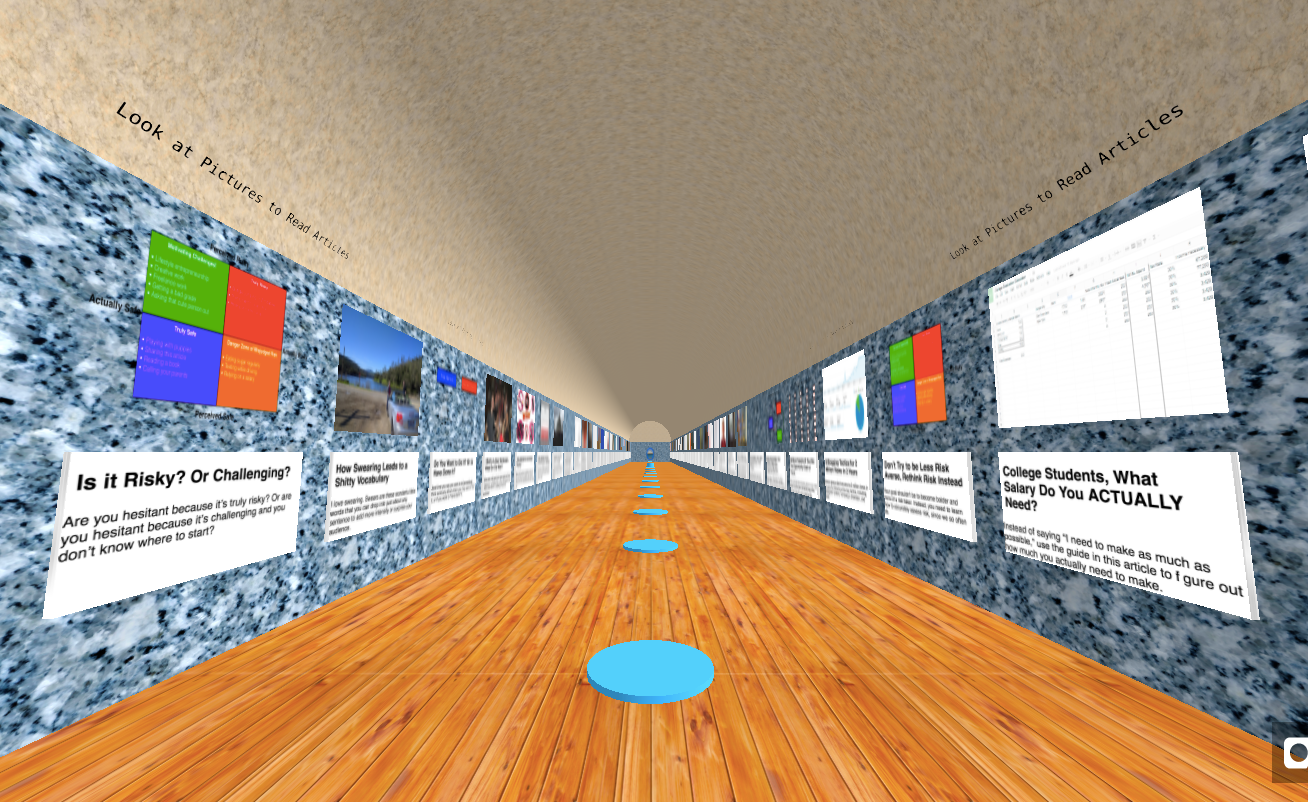
With the home view done, it was time to move on to #2. How to display the list of all articles and books? I had a few ideas for some ways to spread them all out three-dimensionally, but ended up going with a hallway since it was easier, and made more immediate sense to viewers.
Creating a Basic Hallway Template
The first step was to create a sort of “template” that I could use to generate the hallway based on how many articles I had.
Since I’ll keep adding articles into the future, I couldn’t use a finite hallway, since it would eventually run out of space. Instead, I needed to design something that could be repeated indefinitely and still look nice, and automatically scale itself to how many articles were being displayed.
I eventually settled on a fairly basic shape: a floor, two walls, and an arched roof. I found free wood, white marble, and blue marble textures for making it look nice. Then I added space on both walls for an article picture, and the article title plus excerpt. So now each “unit” of the hallway could have one article on both sides, with some buffer.
Scaling the Template to the Number of Posts
The next trick was to get the room to scale itself based on how many articles there were. I did this by declaring a Length and Width variable for the hallway, with width being fixed based on what looked nice and Length being a function of how many articles there were:
<% count = @posts.count %> <% length = (((count+1)/2+1) * 5).to_f %> <% width = 16.0 %>
What that does is figures out how many Posts (articles) there are, then figures out what the length should be. The function looks a little strange since when there are only 1 or 2 posts you want the length to be 10, but when there are 3 or 4 you want it to be 15, and so on. Then it needs to be a float for reasons you’ll see soon.
Now using those Length and Width variables, we can set the length of the floor, walls, and ceiling.
Here’s the floor:
The walls:
And the roof:
Adding the Articles
With the room in place, now I needed to place the articles in it.
Here’s where things became a little tricky. You can’t just put HTML directly onto an object in A-Frame, since you need to make it an Asset first. So within the Assets section, I ran a function to create a bunch of Divs for all of the articles:
<% @posts.each do |post| %> <% target = "article-" + post.id.to_s %> <% pic = "picture-" + post.id.to_s %>
<%= post.title %>
<%= raw post.excerpt %>What this does is go through each article and create a Div with the “id” of “article-1” (if it were the first article), and then take that article’s image and create an asset for it with the “id” “picture-1”.
Then for placing it in the scene, I had to access the articles again, find their respective assets, and then figure out where in the room they should go:
<% post_count = 0 %> <% @posts.each do |post| %> <% target_asset = "asset:#article-" + post.id.to_s %> <% target_picture = "#picture-" + post.id.to_s %> <% x_value = (((post_count)/2).ceil * 5) + 5 %> <% z_value = (width/-2.2) * (-1 + ((post_count % 2) * 2)) %>
What this does is:
- Find the next article in my list of articles
- Find that articles Text and Image assets from earlier
- Figure out where that article should go on the X axis (how far down the hall)
- Figure out where it should go on the Z axis (left or right side)
- Place the picture based on those X and Z values, plus figure out if the picture needs to be rotated 180 degrees or not
- Place the article title and description based on those X and Z values.
- Then go to the next article!
Navigating
The last piece was figuring out how someone gets to see all of the articles. If they have a Vive or Oculus, then they’ll have controllers for moving with, but most people will be looking at the site on their phones and won’t have any kind of motion controls, so I needed to do everything based on gaze.
I found the excellent Aframe Extras component which let me place “disks” that you could look at in order to be slowly moved around the room. Then all I had to do was place one of these disks every 10 units (every 2 articles), along with some instructions to look at the article pictures to go to the article.
<% cylinderPos = 10 %> <% while cylinderPos < length do %>
Adapting for the Lessons Page
The Lessons index page was almost the same, but with two books at a time instead of one article, no text, and bookshelves. The bookshelves were a simple extra couple of elements based on the length of the room:
And then I needed to come up with new functions for figuring out the X, Y, and Z position of each book in the list:
<% x_value = (((lesson_count)/4).ceil * 2) + 2 %> <% y_value = ((lesson_count % 2) + 1 ) * 3 %> <% z_value = (width/-2.2) * ((((lesson_count % 4) / 2) * 2) + -1) %>
Alright! Hallways in place, now I just need to let you read the content.
Reading the Content
The last piece was the design a room template for showing you an article or book lesson. This ended up being the most frustrating part, and the one I’m still sort of struggling with (as you can see on some of the article views).
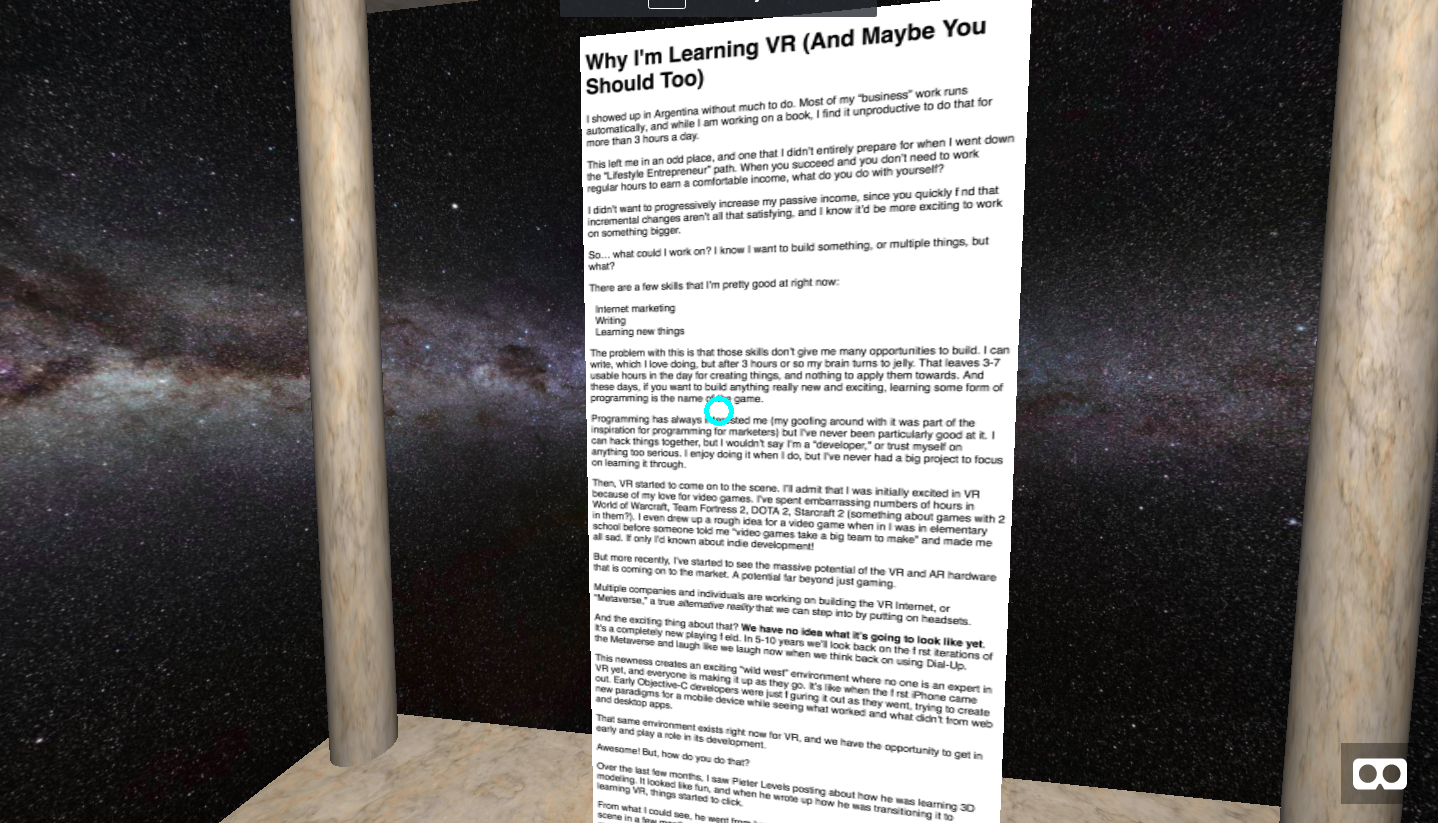
First, the easy part was making the room. I found a nice picture of our galaxy and set that as the sky, then built a little white marble platform using the same asset as our roof in the Index view.
Then came the hard part.
Displaying the Content
For showing the actual article, I had a few options. I could do a continuous scroll like how you’re reading this article, I could do a paginated navigation like reading a book, or I could do something completely different like laying the whole article out like a room in a museum.
I ended up going with continuous scroll since that seemed the most familiar, though I will likely try other forms later. Reading in VR will be, I imagine, an ongoing experiment to figure out what feels most natural.
Then the next challenge was how do I put the entire article in there for you? Remember how the displaying HTML works:
- Create an HTML asset
- Draw a canvas onto an object
- Put the HTML asset on that canvas
But since some of my articles are 4,000+ words long, and others are only 300, all of those factors would have to be a function of length in order to make it look nice. So I just go based on character count, right?
Well, no.
See that last line (The “Well, no.” one)? That was only 9 characters.
But in terms of vertical space, it took up the same as that last line, which was 47 characters, right? So then we need to go based on number of lines.
But that’s not how HTML works. The number of lines is based on the screen you’re viewing something on. The closest we can get is the number of Paragraph tags, but even that’s imperfect since this is a 4 line paragraph, the last one was 2 lines, and the two before that were 1 line.
So for the time being, getting the physical length of an article had to be extremely unscientific. I added a function to count all of the
tags in the article, and save that as a variable:<% fullText = @lesson.body %> <% pCount = fullText.scan("
").count %>Then, I had to create the object that the article was viewed on, and the canvas that the HTML was added to, based on that “pCount” variable:
What you can see there is that:
- The position is based on the total size, since I just want the top of the article to be visible
- The Draw is fixed at 850 wide, but then the height is 244 times the number of paragraph tags
- And the scale ended up being exactly the number of paragraph tags (somehow)
Now I’d love to say I had some scientific process for figuring this all out, but it was 100% guess and check. And unfortunately, as the length goes up, the text quality degrades, so I have to cut it as close as possible to the ends of the articles which means that some of them are cut off at the end. Ugh. I’ll figure out something better in time.
Scrolling
Anyway, now we have this massive slab of text, but you need to be able to scroll it. Since there are no scroll controls, I figured the most natural thing would be to add a function for moving it up and down based on looking at the top and bottom of it.
So I added a Javascript function to the application file:
function moveText(amount){ target = document.querySelector("#articleDisplay"); targetPosition = target.getAttribute("position"); stepCount = 0 var id = setInterval(frame, 5); function frame(){ if (stepCount == 100) { clearInterval(id); } else { stepCount++; target.setAttribute('position',{ x: targetPosition.x, y: targetPosition.y + (amount/100 * stepCount), z: targetPosition.z }); }; }; }
And then added two invisible boxes to the scene on top of the article:
And then I just needed to add the “moveText” function to those objects when the page was done loading:
window.onload = function() { document.getElementById("downButton").addEventListener("mouseenter", function() { moveText(2); }); document.getElementById("upButton").addEventListener("mouseenter", function() { moveText(-2); }); };
Hiding the Article
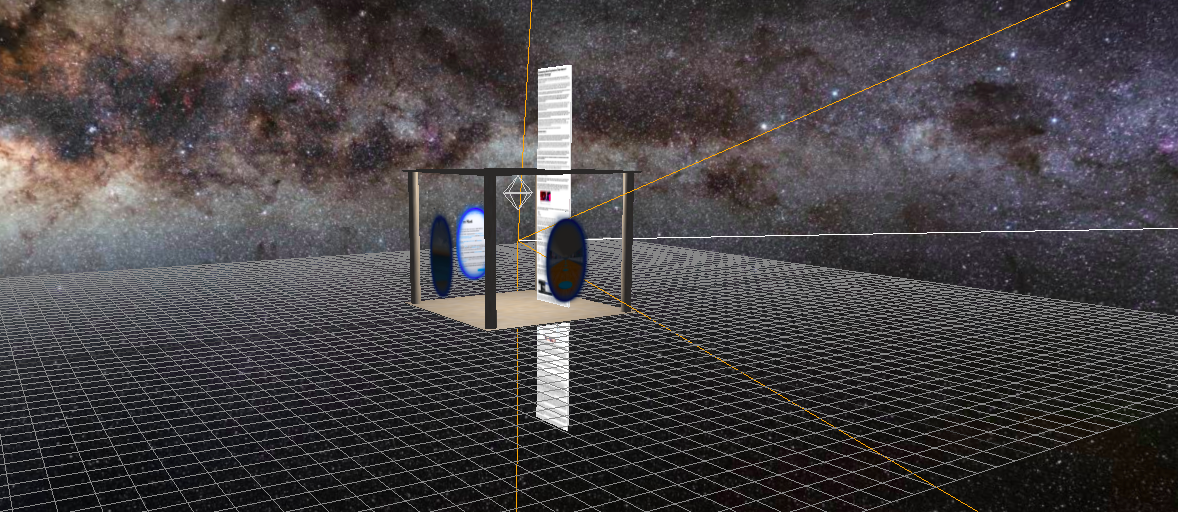
Last, I didn’t want you to see all of the article you had already read and everything that was to come… so I added the roof and floor. I would love it if you could just float in space reading it, but until I figure out a good way to hide what’s done, I need to hide it in the roof and floor.
If you’re not sure what I mean, here’s a side-view of the scene when you’re partway through an article:
Next Steps
Like I said at the outset, this isn’t done and still has some refinement to be made, but it’s close! And much of that refinement will come with improvements to the A-Frame framework, so I do have to wait a bit.
It does get me extremely excited about other opportunities for VR, though. I think right now it’s very early and thought of as something for gaming, video, (cough porn), and novelties, but there’s definitely the potential to reimagine how we interact with information through this three dimensional visual-first (instead of text-first) space.
I hope that if you came into this without any experience in A-Frame or WebVR, it got you excited about picking it up for yourself. I was able to do this in my first two weeks of learning it, so it’s not like there’s a crazy intense learning curve. The more people who are working on projects like this, the faster the whole environment can advance.
A few last things:
- If you have ideas for improvements to the code, please let me know on GitHub (pull requests very selfishly welcome!)
- If you have feature ideas, or questions about how I did anything that I didn’t cover here, let me know on Twitter. Always happy to update this article in the future.
- Look out for future VR stuff!